When To Sharpen Your Lawn Mower Blade
Signs That Your Mower Blade Needs Sharpening
- Torn or Ragged Grass Tips: A sharp blade slices grass cleanly, while a dull one tears the grass, leaving jagged edges. These torn tips may turn brown, making your lawn appear unhealthy.
- Uneven Cutting: If you notice uneven patches on your lawn after mowing, this could indicate that the blade’s sharpness has deteriorated.
- Increased Effort While Mowing: A dull blade can make mowing feel more labor-intensive as the mower struggles to cut through grass effectively.
- Visible Nicks or Damage on the Blade Edge: Regular inspection of the blade may reveal chips or dents, which compromise its cutting efficiency.
Seasonal Considerations
- Spring: After months of inactivity during winter storage, inspect and sharpen the blades before the first mow of the season to ensure optimal performance.
- Mid-Growing Season: During peak growing periods in summer or early fall, a quick check can identify if additional sharpening is required due to heavy use.
- End-of-Year Maintenance: Before storing your mower for winter, inspect and sharpen your blades as part of routine maintenance.
Why Sharp Blades Matter
| Benefit | Explanation |
| Promotes Healthier Grass | Clean cuts reduce stress on grass blades and minimize susceptibility to disease. |
| Improves Lawn Appearance | Evenly cut grass results in a smooth, professional-looking finish. |
| Saves Energy | A sharp blade requires less effort from both you and the mower’s motor/engine during operation. |
| Extends Mower Lifespan | Reduced strain on other components helps maintain overall machine performance. |
Establishing a Routine Inspection
To maintain optimal results throughout mowing season: 1. Inspect blades visually after every 2–3 uses or whenever uneven cuts are noticed. 2. Check for any visible signs of damage including rust spots or bent edges. 3. Plan ahead—sharpening prior to heavy usage periods ensures consistent performance.
By recognizing these indicators early and establishing regular inspections based on seasonal demands or signs of wear, you’ll ensure that both your lawn stays healthy and your mowing experience remains smooth year-round.
Frequency of Sharpening
Determining how often to sharpen your lawn mower blade is critical for maintaining a healthy lawn and ensuring efficient mower performance. Dull blades can result in uneven cuts, damage to your grass, and increased wear on your mower. Understanding the factors that influence sharpening frequency will help you set a schedule that suits both your equipment and lawn care needs.
Factors That Affect Sharpening Frequency
- Frequency of Lawn Mowing:
If you mow frequently during the growing season, such as weekly or bi-weekly, the blades will dull more quickly due to regular use. - Lawn Size and Type:
Larger lawns require extended mowing sessions, which can dull blades faster. Additionally, certain grass types (like Bermuda grass) are tougher on blades compared to finer varieties. - Debris in Your Yard:
Rocks, sticks, and other debris can chip or nick the blade edges. If your yard often contains such obstacles, you’ll likely need to sharpen more frequently. - Grass Conditions:
Wet or thick grass puts more strain on the mower blade compared to dry grass. Heavy-duty workloads like cutting overgrown areas may dull edges faster.
General Guidelines for Sharpening Frequency
| Usage Level | Recommended Sharpening Frequency |
| Light Use (small lawns) | Every 50 hours of mowing |
| Moderate Use | Every 20–25 hours of mowing |
| Heavy Use (large lawns) | Every 10–15 hours of mowing |
For most homeowners with average-sized yards, sharpening once or twice per mowing season is usually sufficient. However, professionals or those with large properties may need to sharpen their blades more often due to higher usage rates.
Signs It’s Time To Sharpen
- Torn Grass Tips: Instead of clean cuts, dull blades tear at the grass tips. This can leave brown edges and make your lawn more susceptible to disease.
- Uneven Cuts: Strips of uncut or unevenly mowed grass are another sign that sharpening is overdue.
- Increased Mowing Effort: If your mower feels like it’s working harder than usual or leaving patches behind even after multiple passes, blade sharpness could be an issue.
- Visible Blade Damage: Regularly inspect your blade for nicks, chips, or other damage that might impair its cutting ability.
Pro Tip for Longevity
- Avoid mowing over sticks or rocks.
- Keep an eye out for debris before starting.
- Use high-quality replacement blades designed specifically for your mower model when necessary.
By paying attention to these factors and monitoring blade performance regularly, you’ll ensure a healthier lawn while extending the life of your equipment.
Preparing To Sharpen the Blade
Proper preparation is crucial to safely and effectively sharpening your lawn mower blade. Before starting, ensure you have the right tools and a safe working environment. Follow these steps for a smooth and efficient process.
1. Gather Necessary Tools and Equipment
To sharpen your blade, you’ll need the following items:
– Protective Gear: Safety gloves, goggles, and hearing protection to reduce injury risks.
– Socket Wrench or Spanner: To remove the blade from the mower securely.
– Blade Sharpener Options: Files (mill file), sharpening stones, or an angle grinder with grinding attachments.
– Clamps or Vise: To hold the blade in place during sharpening.
– Wire Brush or Steel Wool: For cleaning debris off the blade before sharpening.
2. Prepare a Safe Workspace
A clean, well-lit workspace minimizes accidents and makes sharpening easier. Ensure your workbench is stable, and keep all sharp tools organized to avoid mishaps.
Here’s how to set up your area: | Equipment | Purpose | Tips for Setup | |——————-|————————————–|————————————-| | Workbench/Vise | Securely holds blades | Position at a height that feels comfortable for you when standing or sitting. | | Protective Surface| Prevents damage to tools or surfaces| Use heavy cardboard or rubber mats under tools during use. | | Lighting | Provides clear visibility | Use overhead lamps or task lighting for focused brightness on your work area.|
3. Disconnect Power Source
For safety reasons, always disconnect the lawn mower from its power source before working on it: – For gas mowers: Remove the spark plug wire. – For electric mowers: Unplug the power cord or remove batteries if applicable.
This step prevents accidental starts while you’re handling sharp blades.
4. Remove the Blade Safely
Removing the lawn mower blade requires proper technique to ensure stability during disassembly: 1. Flip your mower onto its side with the air filter facing up (to avoid oil spillage for gas models).
2. Use a socket wrench to loosen and remove mounting bolts that hold the blade in place. 3. Mark one side of the blade (e.g., with tape) so that you remember which side faces downward when reattaching it later.
5. Clean Off Debris
Before sharpening, check that dirt, grass clippings, and rust are removed from both sides of the blade: – Scrub with a wire brush or steel wool. – Rinse off residue using warm water if needed; dry thoroughly afterward to prevent corrosion.
6. Inspect Blade Damage
After cleaning, inspect for cracks, chips, or severe wear: – Minor nicks can often be smoothed out during sharpening. – Heavily damaged blades may require replacement instead of sharpening.
By preparing properly before starting any work on your lawn mower’s blades, you’ll ensure not only better results but also a safer process overall—a professional approach every homeowner can adopt efficiently at home!
Blade Sharpening Methods
Sharpening your lawn mower blade effectively requires the right tools, the correct technique, and attention to detail. Below are some commonly used methods to sharpen mower blades, along with step-by-step guidance for each approach.
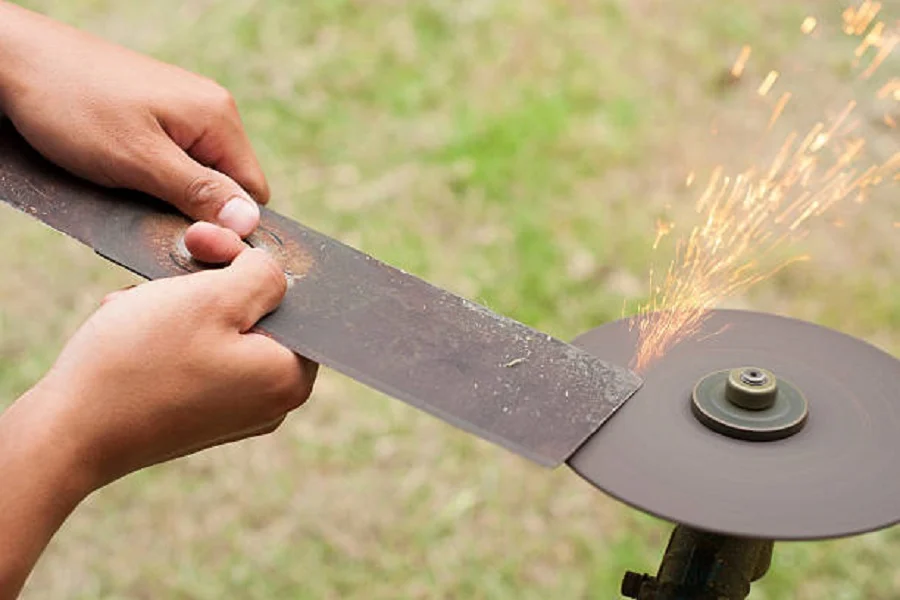
Using a Bench Grinder
- Attach a grinding wheel suitable for metal.
- Ensure the grinder is secured on a stable surface.
- Wear safety glasses and gloves to protect yourself during use.
- Hold the blade securely against the grinder at its original angle (usually 30-45 degrees).
- Maintain steady pressure to avoid over-grinding or creating an uneven edge.
- Move the blade across the grinding wheel in smooth, controlled passes.
- Avoid overheating by pausing if necessary or dipping the blade into cool water intermittently.
- Check that both sides of the cutting edge are evenly sharpened and free from burrs or nicks.
Using a File
For those without access to power tools, a hand file is an affordable and effective option. This method provides more control but requires more time and effort.
- Clamp the blade firmly in a vise to keep it steady during sharpening.
- Hold a metal file at the same angle as the blade’s original bevel.
- Push in one direction only (away from you), applying moderate pressure.
- Alternate sides of the blade to keep it balanced.
- Continue filing until you achieve a sharp edge free from damage or uneven spots.
Using an Angle Grinder
An angle grinder is highly versatile and works well for sharpening mower blades quickly.
- Attach a grinding disc appropriate for metal materials.
- Wear protective gear such as goggles, gloves, and ear protection.
- Hold the grinder at an angle that matches the bevel of your blade.
- Work in short bursts with light-to-moderate pressure, ensuring you don’t remove too much material at once.
- Check Progress Regularly:
Use consistent strokes along both sides of your blade until it feels sharp to touch while being careful not to overheat it during grinding.
Comparing Methods
| Method | Pros | Cons |
| Bench Grinder | Quick results; efficient for heavy wear | Requires experience; higher cost |
| Hand File | Low-cost; high precision | Time-consuming; labor-intensive |
| Angle Grinder | Versatile; portable | Potentially harder to control |
Tips for Best Results
- Always maintain consistent angles on both cutting edges during sharpening to ensure balance.
- Avoid removing too much material—this could weaken your blade over time.
- After sharpening, check your work by running your fingers carefully along with (but not directly onto) each edge—you should feel smooth sharpness without jaggedness or rough patches.
By selecting one of these methods tailored to your tools and skill level, you’ll restore optimal cutting performance to your mower blades while maximizing their longevity.
Balancing the Blade
After sharpening your mower blade, balancing it is a crucial step that ensures smooth operation and prevents damage to your mower. An unbalanced blade can cause vibration, excessive wear on the mower’s engine and deck, and even uneven cuts to your lawn. Below is a detailed guide on how to balance a mower blade effectively.
Why Balancing Is Important
- Prevents Vibration: An unbalanced blade causes the mower to vibrate excessively, which can damage internal components over time.
- Improves Lawn Appearance: A balanced blade ensures an even cut, preventing scalping or uneven patches in your yard.
- Extends Mower Life: Properly balanced blades reduce strain on the engine and other moving parts, increasing their lifespan.
- Enhances Safety: Vibrations from an unbalanced blade could lead to parts loosening or failure during operation, posing safety risks.
Tools You’ll Need
- A bench grinder or file (used earlier for sharpening)
- A balancer tool (available at hardware stores)
- A nail or screwdriver (alternative to a balancer tool)
How to Check for Balance
- Remove any dirt or debris from the blade after sharpening.
- Locate the mounting hole in the center of the mower blade.
- Place the center hole of the blade onto the cone-shaped balancer tool.
- Observe whether one side of the blade dips lower than the other. If it does, this side is heavier and needs additional filing.
- Drive a sturdy nail into a wall at least halfway in or use a horizontal screwdriver resting on two supports.
- Hang the center hole of the blade on this nail or screwdriver.
- If one side tilts downward significantly more than the other, that side is heavier.
- Remove small amounts of metal from the heavier end using a file or grinder. Focus near—but not directly on—the edge you’ve already sharpened.
- Repeat steps 2–3 until both sides remain level when tested with your chosen method.
Tips for Effective Balancing
- Always file down small amounts at a time; removing too much metal can weaken certain parts of the blade.
- Avoid focusing too much on one area as it may create uneven wear patterns across its surface.
- Replace blades with deep dents or cracks instead of attempting excessive balancing since structural integrity may already be compromised.
| Issue | Symptom | Solution |
| Excessive vibration | Entire mower shakes | Re-balance using above methods |
| Uneven lawn cuts | Scalped/high patches | Sharpen & balance properly |
| Quick engine wear | Loud/unstable operation | Ensure correct balance after filing |
Regularly checking and balancing your lawnmower blades after sharpening will not only ensure optimal performance but also keep your machine running safely and efficiently over time. Making this part of your maintenance routine will save you potential repair costs while keeping your lawn looking pristine season after season.
Balancing the Blade
Proper blade balance is a critical step after sharpening your lawn mower blade. An unbalanced blade can lead to uneven cutting, vibrations, and potential damage to your mower’s engine or deck. This section will guide you through the importance of balancing your blade, how to check for imbalances, and methods to ensure a properly balanced blade.
Why Blade Balance Matters
An unevenly balanced mower blade can: – Cause vibrations that may loosen bolts or stress the mower’s components. – Lead to an inconsistent cut, leaving patches of untrimmed grass. – Increase wear and tear on the mower’s engine by forcing it to work harder.
Balancing your blade ensures smooth operation and extends the lifespan of both the blade and the mower itself.
Tools Needed for Balancing
You’ll need just a few basic tools to check and correct your blade balance: – A blade balancer (available at hardware stores or online) – Alternatively, a nail in a wall or screwdriver can act as a makeshift balancer – Safety gloves (to handle sharp edges) – Grinder or file (for removing excess material during balancing)
How to Check Balance
- Clean The Blade: Before testing, ensure that the blade is free of debris like grass clippings or dirt, as this can affect balance.
- Use A Blade Balancer: Place the center hole of the lawn mower blade onto the spindle of a commercial balancer. If one side dips lower than the other, it indicates imbalance.
- DIY Option: If you don’t have access to a balancer, drive a nail into a wall horizontally or use an upright screwdriver. Place the center hole of the blade over it so it pivots freely. The heavier side will tilt downward.
- Mark The Heavier Side: Once identified, mark which side needs adjustment.
How To Balance The Blade
If an imbalance is detected: 1. Remove Material From The Heavy Side: Use a metal grinder or hand file to remove small amounts of material from the heavier side of the blade. Focus on areas close to the cutting edge for effective results. 2. Work Gradually: Remove material in small increments and re-check balance frequently rather than removing too much at once. 3. Avoid Over-Thinning: Ensure you don’t weaken any part of the blade by grinding too aggressively in one area.
Tips For Proper Balancing
- Always maintain consistent sharpening across both edges before balancing; uneven sharpening often causes imbalance in blades.
- Replace severely worn-out blades instead of attempting extensive repairs as they may not be salvageable even after balancing efforts.
| Problem Caused by Imbalance | Solution |
| Uneven cuts | Proper balancing after each sharpening |
| Vibrations | Regular inspection and correction |
| Engine strain | Sharpening and maintaining balance regularly |
Taking time to balance your lawn mower blades not only helps maintain peak performance but also ensures safer operation throughout its life cycle.
Maintaining Your Mower Blade
Proper maintenance of your lawn mower blade is essential to extend its lifespan, ensure efficient mowing, and maintain a healthy lawn. A neglected blade can lead to uneven cuts, strain on your mower, and even damage. Below are practical steps and tips for maintaining your mower blade in optimal condition.
Regular Cleaning
Grass clippings, dirt, and debris can accumulate on the blade over time. This buildup not only dulls the blade but also reduces its efficiency. Keeping the blade clean is a simple yet crucial part of maintenance.
- Disconnect the spark plug for safety before cleaning.
- Use a stiff brush or cloth to wipe down the blade and remove clumps of grass or dirt.
- Avoid using water excessively as it could cause rusting; if necessary, clean with a damp cloth and dry immediately.
- Use a plastic scraper or putty knife to remove hardened dirt or residue.
- Apply a mild degreaser if needed for sticky deposits but ensure it’s thoroughly rinsed off.
Inspecting for Damage
Frequent inspection of your mower blade helps identify potential issues early.
- Chips, cracks, or bends in the blade surface.
- Excessive wear that may compromise performance.
- If you notice severe damage that cannot be fixed through sharpening alone, replace the blade entirely to prevent further harm to your lawn mower or grass.
Preventing Rust
- Store the mower in a dry area away from moisture when not in use.
- After cleaning, wipe down the blade with an oil-soaked rag (such as motor oil) to create a protective layer against rust.
- If storing for extended periods during winter months, consider removing the blades altogether and coating them with rust-inhibiting spray before storage.
Lubricating Moving Parts
- Use lightweight machine oil on bolts securing the blades.
- Avoid over-lubricating as excess oil may attract dust and debris.
| Maintenance Task | Frequency | Remarks |
| Cleaning After Mowing | After every mow | Ensures no buildup affects performance |
| Blade Inspection | Every 1–2 months | Check for nicks/damage needing replacement |
| Rust Prevention | Regularly / Seasonally | Essential before off-season storage |
Storing Blades Safely
- Place them in a secure location away from children or pets.
- Ensure they are stored flat to avoid bending.
- Label sharp edges (if removed) as an added safety measure during handling later.
Taking these maintenance measures ensures your lawn mower operates smoothly while protecting both your equipment investment and lawn health long-term. Regular attention minimizes costly repairs while delivering consistent mowing results year-round!